Showing posts with label girls' room. Show all posts

Wednesday, August 17, 2011

Twin Girls’ Bedroom Tour

Hi Friends! 

Starting this week, I am going to give you a tour of my house, or at least most of it {there are a few spaces you just don’t wanna see.}

Today we’ll begin in my twin girls’ bedroom cause there’s too much pink and sweetness to resist…also it’s next in line for a make-over, so I want to show you before it changes! By Christmas their room will hold 2 twin beds {somehow?? haven’t figured that out yet} a canopy {or two?} new linens and pillows {that are almost all entirely sewn by yours truly} new drapes {also likely created on my sewing machine} and a new wall color {I better start on that now}.

OK let’s begin the tour…shall we?

IMG_9554

Thursday, December 30, 2010

My top 10 projects of 2010

I heard about a little big 'ol party going on over at Rhoda's Southern Hospitality that I thought I'd join! To see an amazing collection of projects, check out
I've sure learned a ton about blogging these last few months. There is a HUGE learning curve that I'm finally feeling like I am actually on.  Thanks to everyone who has supported me! 

My top 10 projects of 2010
{To see the full post for any of these,just click on the picture}
 10. Homemade Pottery Barn Kids Ballerina bedding in Toddler bed size {my twin girls' Christmas gift}


9.  Frilly Towels {Christmas gifts to some special ladies}

8. My son's refinished dresser {that you will likely see again as a favorite project of 2011 when it gets repainted again!}

7. My twins' shabby chic refinished dresser {my first furniture painting project ev-ah!}

6. Cancelling Cable {YES, that definitely counts as a project, getting DH to cancel cable is no easy feat!}

5. No-sew POOFY tutu {"my big tutu" as DD calls it}

4. Planting my first garden {a fall garden, I like to keep things challenging interesting}

3. I discovered Chalk Board Paint! {but have STILL yet to find/buy dustless chalk}

2. Studs to Spa Master Bath Renovation {originally billed as "Studs to Spa in 2 weeks" is now 90% completed at the 5 month mark!}

1. And my top project of 2010...................THIS BLOG! {with a world of thanks to my loyal readers and a lot TON of encouragement from DH and a few other BFFs, I couldn't wouldn't have done it without you!}

Bring on 2011!

Thanks everyone xo

Homemade Pottery Barn Kids Ballerina Toddler Bedding

Whew! I just came up to the surface after a week spent under loads of wrapping paper, tinsel, dishes, ribbons, bows, dishes, boxes, bikes, dishes, in laws, driving, dishes...
did I mention DISHES?!

Seriously, I've missed blogging and appreciate my loyal followers' patience...I've gotten updates from some of my favorite blogs and wonder how on earth they've found time to post in the last week. 

In the past 7 days I've:
enjoyed watching the faces of 3 kids get bikes
logged 17 hours in the car
seen all sets of parents/grandparents and immediate aunts, uncles and cousins
hosted 2 Christmas dinners with 12+ people
video taped 4 separate Christmas present opening sessions
READ the manual to my new camera (yes, you read that right...I actually read something other than a blog and yes, I got a new toy for Christmas, too!)
been to the camera store to have my cracked lens protector removed (after learning the hard way to always wear my camera strap)
prepared the beds 4 times for house guests
ate more than my fair share of sweets
enjoyed a few glasses of wine
and created some amazing memories that made this truly my
BEST CHRISTMAS EVER!

I am so thankful to my whole family for making this Christmas so wonderful and special.  When I found out the truth about Santa I was crushed...but never stopped believing.  What I didn't know, was how much fun it would be when I'd get to be Santa myself.  Seeing your own children light up with joy is a most amazing feeling.

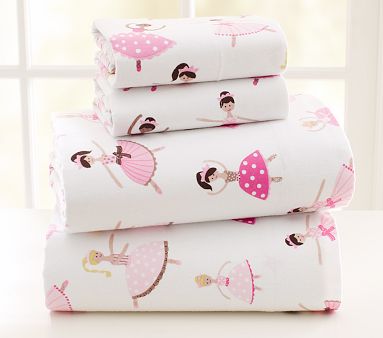
Ok, so here we are...3 hours post the last official Christmas event and our last guests departing (bitter sweet)...and I miss you guys!  I've been anxious to post my finished pictures of the Pottery Barn Ballerina sheet/duvet sets I made for my girls' toddler beds. 

A couple months ago my daughters saw this in the Pottery Barn Kids catalog:
Does it get any cuter?

They both wanted it sooooooo badly!  Unfortunately, it only came in twin size and they are still in toddler beds.  But every week, a new Pottery Barn Kids catalog would arrive in the mail and low and behold, they'd turn right to the same page and ask for the sheets.  When we were on about our 5th catalog (they've got some good marketing people working for them) they finally started asking for the sheets "when they get bigger and get big girl beds".  Sure, that sounds like a plan.  Then one night I got a crazy great idea, I'll buy the sheets and make toddler bedding for them out of the fabric. So in mid-November I ordered a set of twin sheets...thinking a month was ample time to sew them. 
It was at that moment I learned they were on back order until DECEMBER 20! What?!  Well, I ordered them anyways, figuring they'd most likely be sent sooner as things I've bought on back order before have come sooner. 
Well, I was WRONG!  They arrived Dec. 21, as promised.  Giving me exactly 3 days to complete the project. That's a tall order for me....I can get 90% finished with a project in 3 days, but COMPLETE it, that's just not possible very hard for me.  

Well, at any rate, enough commentary, I did get the sheets, pillow cases and duvets COMPLETED by my deadline of Christmas Eve!  And all of the sewing happened after 9pm.  (I was up until 1:00 am the 3 nights leading up to Christmas, and midnight the few before that.....but I did breastfeed 3 babies after all, so 1am is nothing!) 

Without further ado..........


I started with the sheets, which I made from pink/white polka dot flannel I got from the local fabric store (it matches the skirt on some of the ballerinas)
Also from the fabric store is the striped flannel that backs the duvet.

The duvets were made with ballerina fabric on one side and striped fabric on the other (each girl picked out their fabric last month, without knowing it was going on their new sheet set!) 
I used ribbon to tie the bottom of the duvets, hot pink polka dots for one and light pink polka dots on the other.


The pillow cases took the most time with all the details on the end: coordinating fabric ruffle that matches the underside of the duvet and ribbon that matches the ties on the duvet:


Well, that about sums it up! A very ballerina room, fit for 2 princesses.


I know I've been MIA the last week, but that's not due to lack of ideas! I have lots of things to talk about with you guys, so thanks for reading (DH thanks you, too!)
Coming attractions:

*Shower head water filters (and being a "green tween")
*My new compost bin (I'm a composter now!)
*Cute ruffled camera straps (to avoid further trips to the camera store) 
*My Restoration Hardware homemade kitchen island (I brought the wood home last week)
*Bathroom paint (I am finally going to finish that last 10% of the master bath)
*Kitchen/Family room paint and board & batten
*Top 10 Projects of 2010 (and looking forward to many more in 2011)

Have a safe and exciting
New Year's Eve!!

I joined the little party going on at Tater Tots and Jello!


Thursday, November 4, 2010

"Shabby Chic" Dresser- The story of refinishing/painting a dresser

Yeah, it's DONE! 
And I am happy with it LOVE it! 
(Is that ok to say?)

A month or so ago I scored this dresser for free on Freecycle.  I heart Freecycle.  I've gotten a girls bike, princess DVDs, a skateboard, a phone, and now a dresser all for free.
 
Originally the dresser was going to go in my son's room.  He currently has no dresser.  Silly me thought the drawers under the bed would work long term as clothing storage....but what used to fit 10 pair of size 18 month pants, now fits 4 pair of size 6. 
 
With Legos spilling out from every nook and cranny, DH's clothes in half his closet, and a full-size locker (thanks Santa) in his bedroom, my son's clothing storage space is grim.  I dread putting away clean laundry (a great excuse not to do the laundry, huh!)  Anyways, this dresser was supposed to go to him but then when I got it home I decided it was a little to girly with its curved base, to go in my son's Star Wars/Surfing/Lego "themed" room.  (We'll work on that later.)
And seriously, what girl couldn't use more dresser space?  When you share your dresser with your sister, change outfits on the hour, and can't reach your closet clothes, another dresser comes in super handy.
 
Ok, so enough about that.  Here's the BEFORE:
Not bad for *free*
First I sanded it down to bare wood (I love my electric sander- a present from DH- is that like giving an iron?  NO!!  I love it!).
It sat in my garage for a few weeks like this.  Finally I got the motivation to start painting.  The girls and I put on our painting clothes and got to work.  We put a tarp down in the driveway, gathered all of our tools:

tarp
paint brushes
high quality foam rollers
roller handles
paint trays
white paint (left over from dresser I had painted for them previously)
stir sticks
paint can opener (I don't have to use a screwdriver, I found it!)
electric sander
sand paper
primer
......PRIMER.........where's the white primer? 
 ANY WHITE PRIMER. 
We've painted so many things white in our house, we must have 3 left over cans of white primer. 
No.  Nope. No white primer, anywhere.  A garage full of junk things we might need one day, and no white primer. 
So back into the garage goes EVERYTHING and off we head to the paint store for primer. 
Home again, primer in hand and we're ready to go!

First step is to remove the old hardware and fill the holes.  Should have done this before leaving for the paint store so the filler had time to dry and was ready to sand when I got home, but I didn't think that far in advance. 

My helpers hard at work.
Painted one THIN coat of primer.  If there was one thing I learned from painting my kitchen cabinets, it's that you need to go super thin on the coats of paint...and sand between coats.  So that was step 2 after it dried: sand with 220 grit sand paper. 

Primed.
Now it's on to the real paint.  I am using Benjamin Moore's "White Dove".  That's the color of the wainscoting we put in their room and also the color of a dresser I bought and paid to have painted. 

I used a brush for all the corners and beveled edges and a super smooth, high quality foam roller for the flat surfaces.  I did 2 coats of paint for most of it but 3 coats on a few drawers that I had to re-fill and sand down the old hardware holes a little better.  I sanded between each coat with 220 paper. 
Once I had the final coat of paint dry, I took the sander to it once again and distressed it a bit.
Going for a little bit of a "Shabby Chic" look.
 
And what shabby dresser is complete without glass knobs, of course!
I lined the drawers with fabric, attached with Mod Podge.  If you've never used Mod Podge, you gotta try it.  It's kinda like glue, it adheres paper together, and leaves a semi-gloss finish.


Before I slid the drawers back in, I rubbed some wax along the tongue and groove glide rails.

Ok, without FURTHER adieu, the AFTER:

I must have taken 50 pictures of this dresser and never got one I was *thrilled* with. Not sure if it's cause the dresser is so white and the room so bright that the camera had trouble?  But it just never got quite perfectly focused and looking perfect. Hope you get a good jist of it!
 
Ok, so with the new dresser moving in, we needed to do a little clothes organizing. We had 4 sizes of clothing in this bedroom, times 2!  We went though all of the clothes in our current rotation, as well as all of the boxes of hand-me-downs to pick out what fits next.  The girls got a kick out of this. 
They played dress-up all afternoon, trying on clothes that they had never seen before.  It was a big shopping spree in their bedroom (thank goodness for hand-me-downs!)  They also put up a few fights for clothes that were a bit on the small side...but I had to draw the line at the 9 month old Cal Bears shirt they were begging to hold on to (Go Bears!)
 
Organizing:
Funny how the mess has to get really bad before it gets better.
Another problem with our clothes storage is the fact that my girls cannot reach any of their hanging clothes.  This either results in them yanking a dress down, subsequently breaking the hanger...or hollering to me when they need something (which is often considering the number of outfit changes they each make per day hour).  Here's a simple fix:
Just $9.99 at The Container Store.
And finally we were ready to move the dresser in to its new home and fill -er up.
From this:
To This:
I'd say that's a big improvement.
$27 paint +6 foam roller + $10 double hanging closet rod=
$43 closet-built-for-two
It looks SO cute in their VERY GIRLY Room! See their homemade Pottery Barn bedding HERE!
 
Just a quick peek at the dresser I was trying to match.  I bought this (used) dresser, which was  refinished/painted at the store, last year for $300.  I'm super happy with my *free* version!
I'll give you a little tour of the girls' bedroom soon.  Complete with wainscoting, a chandelier and everything GIRLY!

Sweetness

And check out my boy's dresser that I refinished:
 
Linking up to the organization party at Domestically Speaking!  and also to Thrifty Décor Chick’s Before/After party!


Domestically Speaking

thriftydecorchick