I love sewing. I'd probably sew all the time if I could. But one problem with sewing, especially in my house, is all the set-up/clean-up involved since I don't have a designated craft room. Also, I can't bring my sewing projects with me, to work on anywhere, or for little 5 minute moments of free time.
So, I decided to teach myself to knit.
I was at the fabric store the other day, buying fabric to line the drawers of my girls' new dresser (see below) and while there, I wandered into the yarn aisle and decided today is the day I will learn how to knit. I saw a woman shopping for yarn and asked her if she knew how to knit. Yes! I told her that I would like to learn and asked her if she could tell me which needles a beginner should use.
Lesson 1: Needle size depends on the yarn you use.
So first I needed to pick my yarn. She suggested something not too thin and not 100% polyester (as it can be rough on your fingers). I also needed to pick what I want to make so I can chose the yarn. How about a scarf, that's easy, right? I chose "Barley", a nice brown color, in a blend of lamb's wool and acrylic. Then she showed me how to look on the back of the yarn to figure out which size needles I'll need.
The number "13" in the upper left corner of the left purple section is the American measurement size of the needle this yarn requires. The "9mm" is the metric measurement size. The purple square on the right tells you which crochet needle to use...not sure how to read that! And I'm also not sure what the 12R and the 9 STS mean yet, though I'm sure a quick Google search would fix that. But all I needed to know was the "13" and that's what I bought, needles that were size 13.
That night I sat down and did a Google search for how-to-knit videos. I looked at a handful, but ultimately found two that I could easily follow. The first thing I learned is that there are two steps required to get started.
which is your first row of stitches on one needle (are they called stitches when it's knitting?) I watched the the video 3 times before being ready to give it a shot. I picked up the needles and yarn and was ready to go!
So you take the end of the yarn....um, where's the end of the yarn?
Where is the end of the yarn?
I searched and searched. I can't find it! I had to do a Google search for "how to find the end of the yarn".
Seriously!
Apparently I'm not the only one because there were several tutorials on Youtube for just that: How to
Whew, I found the end! Now I'm ready to cast on. Now,that wasn't so hard. The toughest part was the slip knot, well that and finding the end.
After you have finished casting on to one needle, you are ready to introduce the second needle...and now you are knitting! I liked the woman from the first video, so I followed another one of her videos to learn
I have a feeling I'll be working on this for a while. But it is just what I wanted...a very transportable, relaxing craft....doesn't require much thinking (well, scarves don't at least......I think when you get into socks and hats and sweaters and such, you have to do a bunch of stitch counting and keeping track of things)
Scarves are very mundane and easy...PERFECT!
Luckily, I have plenty of time to perfect my knitting skills, so I will be ready for hats and sweaters and blankets when my Grandchildren arrive!
:
:
:
:
:
:
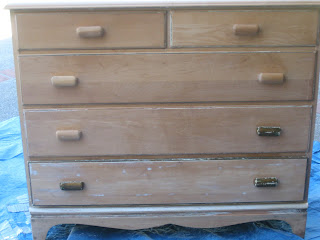
Knitting has been my night craft these last few nights, but during the days I have to keep busy, too. So the girls and I have been working on painting a new dresser for their room. I scored a free dresser from Freecycle (along with Craigslist, one of my favorite sites) and originally intended it to go in my son's room. But after bringing it home, I realized it was a bit girly and would look super cute in my girls' room. Plus, a girl can never have too much storage for clothes, can she? I'm painting it the same color white as their other painted dresser and as their wainscoting: White Dove, Benjamin Moore. I bought their first dresser from this 2nd hand store in Martinez. The owner re-finishes and paints furniture any color you like. So I chose to have him paint it to match the wainscoting and also have it distressed a bit, a little "shabby-chic" looking. I love it!
Anyways.........
I brought home this free dresser and decided it would go to my girls. I will try to copy the look of the dresser they have now. I'm almost done with it, but not quite ready for the final before/after reveal....so here's a little sneak peak!
It came to me already sanded!
My little painters hard at work.
:
:
:
:
:
Stayed tuned for the reveal!
:
:
:
:
Stayed tuned for the reveal!
:
:
:
:
:
Go Giants


No comments:
Post a Comment
Thanks for reading! I LOVE your comments and appreciate the time you take to write them. I welcome questions and promise to answer them!
(You should be able to comment easily, but you'll need to just fill out the word verification box to make sure you are a real person!)